Train for Your 200-Mile Bike Event in 20 Weeks
A 20-week ultra-distance plan with back-to-back weekends, sustained Zone 2 volume, fueling rehearsals and fatigue management to take you to your first double century.
This plan assumes
Are you ready for this plan?
- Can ride continuously for 4 hours at a comfortable pace
- Have a power meter and heart rate monitor
- Have completed at least one 100-mile ride
- Can commit to 5-6 rides per week for 20 weeks
If you have not completed a 100-mile ride, start with an intermediate 100-mile plan first. Start here instead.
Plan overview
Extensive build with sweet spot, threshold, and ultra-specific long rides.
9-14 hours/week
Race simulations, back-to-back days, and nutrition strategy finalization.
10-13 hours/week
Weekly structure
What 200 miles really demands
A 200-mile bike event, often called a double century, is a different animal from a 100-mile ride. The metabolic, mental and logistical demands are not 2× a century, they are closer to 3-4× because the second half is ridden in deep fatigue territory most cyclists never train for.
Expect 10 to 14 hours in the saddle depending on terrain and pace. Sustained energy expenditure typically reaches 6,000-9,000 kJ. Every system that works fine for a century, nutrition, hydration, saddle comfort, mental focus, gets stress-tested past its breaking point. This plan builds the engine, the fueling protocol and the fatigue tolerance to finish strong.
How long does it take to train for a 200-mile ride
The realistic minimum is 16 weeks for an intermediate rider with a strong aerobic base. 20 weeks is the sweet spot for most riders, allowing a true 8-week build phase plus targeted peak training. Beginners or riders coming from low base fitness need 24 weeks or more, and ideally a 100-mile event in the first half of the year as a stepping stone.
The defining feature of any 200-mile plan is the back-to-back long-ride block: a long Saturday (5-7 hours) followed by a moderate Sunday (2-3 hours) starting from mile 80+. These weekends teach your body to produce power on tired legs, the exact skill the event demands.
Pacing strategy for a double century
The pacing rule for 200 miles is simple: ride 5% below the effort that feels right for the first 100 miles. If your century pace is 72% FTP, ride 65-68% for the first half. If your century heart rate target is Zone 2 upper, stay in Zone 2 lower.
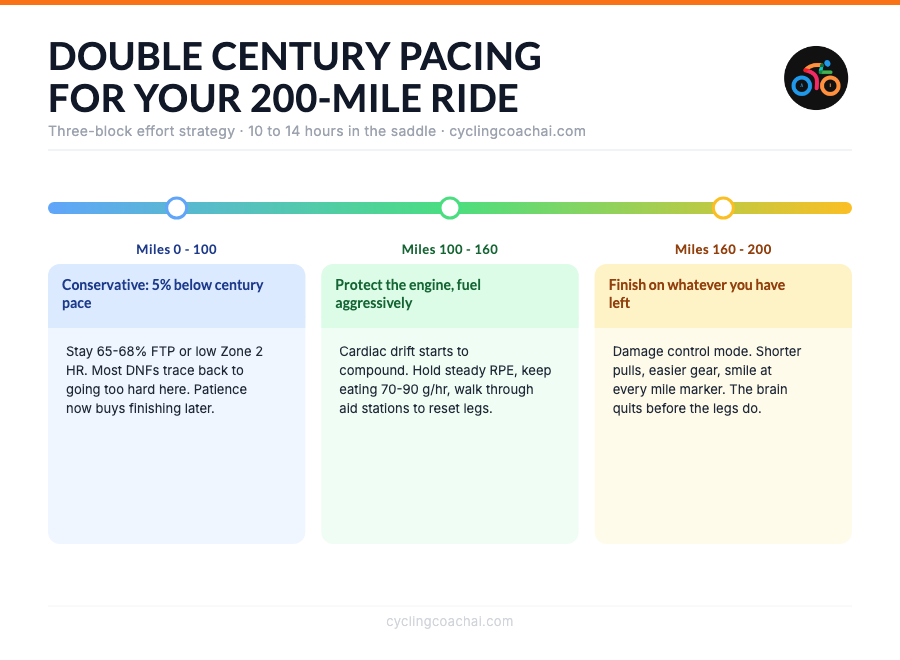
The reason: cardiac drift and muscular fatigue compound non-linearly past mile 100. A perceived "easy" pace at mile 30 becomes survival pace at mile 150 if you started too hard. Conservative pacing in hours 1-5 is what makes hours 8-12 possible.
Event-day nutrition and self-sufficiency for your 200-mile ride
This section covers what to eat and drink on the day of your 200-mile ride. For day-to-day fueling around training rides, see the Fueling your training section further down.
200-mile events often have aid stations 30-60 miles apart. You need to carry, consume and absorb 70-90 g of carbohydrate per hour for 10+ hours without GI failure. That is the hardest part of double-century preparation.
Carbohydrates
70-90 g per hour from mile 20 onward. Mix solid food (rice cakes, bananas, bars) with liquid carbs (drinks, gels) to prevent flavor fatigue. After hour 4 your stomach often rejects gels, so pre-test rice cakes, peanut butter sandwiches or dates during long training rides.
Hydration
750-1,000 ml per hour. Add an electrolyte cap or tab per bottle in heat. Track bottle count by aid station so you do not finish a remote section dry.
Carrying capacity
A frame bag or top-tube bag is essential. Jersey pockets alone cannot hold 10 hours of food, and digging for a gel at mile 140 with cold fingers is harder than it sounds.
Practice nutrition on the bike
Rehearse your exact race-day nutrition on every ride over 4 hours during the build and peak phases. Gut tolerance is trainable, but only if you actually train it.
Mental preparation and fatigue management
The physical demands of 200 miles are massive, but most DNFs are mental. After hour 7 the brain starts negotiating with itself: "just stop at the next town", "this hurts more than expected", "I'll try again next year."
The plan addresses this by including at least three rides over 6 hours in the final 8 weeks. These rides simulate the mental territory of late-event fatigue. They teach you that the discomfort of hour 7 is not a sign to stop, it is the normal state of long-distance cycling, and it passes.
Race-day mental tools: break the ride into four 50-mile segments mentally, eat before you feel hungry, drink before you feel thirsty, smile at aid stations, and refuse to let the second half hurt before mile 130. You are stronger than your fatigued brain claims.
Watch: mental toughness in ultra-endurance cycling

Training zones
This plan uses power zones (% of FTP) and heart rate zones (% of max HR) to guide effort. A power meter and heart rate monitor are required.
Power zones
| Zone | % FTP | RPE | Feel |
|---|---|---|---|
| Z1 Recovery | 0-55% FTP | 1-2 out of 10 | Extremely easy. No sensation of effort. Used only for recovery rides. |
| Z2 Endurance | 56-75% FTP | 3-4 out of 10 | Comfortable, sustainable effort. You are working but could maintain this for hours. |
| Z3 Tempo | 76-90% FTP | 5-6 out of 10 | Moderately hard. Sustainable for 30-60 minutes but requires concentration. |
| Z4 Threshold | 91-105% FTP | 7-8 out of 10 | Hard. You can sustain this for 20-40 minutes with focus. Speaking is difficult. |
| Z5 VO2max | 106-120% FTP | 8-9 out of 10 | Very hard. Maximum sustainable effort for 3-8 minutes. Legs and lungs burn. |
| Z6 Anaerobic Capacity | 121-150% FTP | 9-10 out of 10 | Maximum effort for 30 seconds to 2 minutes. Not sustainable. |
| Z7 Neuromuscular Power | 150%+ FTP | 10 out of 10 | All-out sprint for under 30 seconds. Pure explosive effort. |
Heart rate zones
| Zone | % Max HR | Feel |
|---|---|---|
| Z1 Recovery | 0-59% max HR | Extremely easy. No sensation of effort. Used only for recovery rides. |
| Z2 Endurance | 60-70% max HR | Comfortable, sustainable effort. You are working but could maintain this for hours. |
| Z3 Tempo | 71-80% max HR | Moderately hard. Sustainable for 30-60 minutes but requires concentration. |
| Z4 Threshold | 81-90% max HR | Hard. You can sustain this for 20-40 minutes with focus. Speaking is difficult. |
| Z5 VO2max | 91-100% max HR | Very hard. Maximum sustainable effort for 3-8 minutes. Legs and lungs burn. |
20-Week 200-Mile Bike Training Plan
| Day | Session | Duration |
|---|---|---|
| WEEK 1 | ||
| Mon | Rest | - |
| Tue | Endurance + 3x8min tempo @ 76-90% FTP / 71-80% HR | 75 min |
| Wed | Easy endurance @ 56-75% FTP / 60-70% HR | 60 min |
| Thu | Endurance + 2x10min tempo @ 76-90% FTP / 71-80% HR | 75 min |
| Fri | Rest | - |
| Sat | Long endurance @ 56-75% FTP / 60-70% HR | 2h 30min |
| Sun | Recovery @ 0-55% FTP / 0-59% HR | 50 min |
| WEEK 2 | ||
| Mon | Rest | - |
| Tue | Endurance + 3x8min tempo @ 76-90% FTP / 71-80% HR | 75 min |
| Wed | Easy endurance @ 56-75% FTP / 60-70% HR | 60 min |
| Thu | Endurance + 2x10min tempo @ 76-90% FTP / 71-80% HR | 75 min |
| Fri | Rest | - |
| Sat | Long endurance @ 56-75% FTP / 60-70% HR | 2h 30min |
| Sun | Recovery @ 0-55% FTP / 0-59% HR | 50 min |
| WEEK 3 | ||
| Mon | Rest | - |
| Tue | Endurance + 3x8min tempo @ 76-90% FTP / 71-80% HR | 75 min |
| Wed | Easy endurance @ 56-75% FTP / 60-70% HR | 60 min |
| Thu | Endurance + 2x10min tempo @ 76-90% FTP / 71-80% HR | 75 min |
| Fri | Rest | - |
| Sat | Long endurance @ 56-75% FTP / 60-70% HR | 3h 30min |
| Sun | Recovery @ 0-55% FTP / 0-59% HR | 50 min |
| WEEK 4 | ||
| Mon | Rest | - |
| Tue | Endurance + 3x8min tempo @ 76-90% FTP / 71-80% HR | 75 min |
| Wed | Easy endurance @ 56-75% FTP / 60-70% HR | 60 min |
| Thu | Endurance + 2x10min tempo @ 76-90% FTP / 71-80% HR | 75 min |
| Fri | Rest | - |
| Sat | Long endurance @ 56-75% FTP / 60-70% HR | 4h 30min |
| Sun | Recovery @ 0-55% FTP / 0-59% HR | 50 min |
| WEEK 5 | ||
| Mon | Rest | - |
| Tue | Endurance + 3x8min tempo @ 76-90% FTP / 71-80% HR | 75 min |
| Wed | Easy endurance @ 56-75% FTP / 60-70% HR | 60 min |
| Thu | Endurance + 2x10min tempo @ 76-90% FTP / 71-80% HR | 75 min |
| Fri | Rest | - |
| Sat | Long endurance @ 56-75% FTP / 60-70% HR | 4h 30min |
| Sun | Recovery @ 0-55% FTP / 0-59% HR | 50 min |
| WEEK 6 | ||
| Mon | Rest | - |
| Tue | Endurance + 3x14min sweet spot @ 88-93% FTP / 71-80% HR | 85 min |
| Wed | Easy endurance @ 56-75% FTP / 60-70% HR | 60 min |
| Thu | Endurance + 2x17min threshold @ 91-105% FTP / 81-90% HR | 85 min |
| Fri | Easy endurance @ 56-75% FTP / 60-70% HR | 55 min |
| Sat | Long endurance @ 56-75% FTP / 60-70% HR | 4.2h |
| Sun | Recovery @ 0-55% FTP / 0-59% HR | 55 min |
| WEEK 7 | ||
| Mon | Rest | - |
| Tue | Endurance + 3x15min sweet spot @ 88-93% FTP / 71-80% HR | 85 min |
| Wed | Easy endurance @ 56-75% FTP / 60-70% HR | 60 min |
| Thu | Endurance + 2x18min threshold @ 91-105% FTP / 81-90% HR | 85 min |
| Fri | Easy endurance @ 56-75% FTP / 60-70% HR | 55 min |
| Sat | Long endurance @ 56-75% FTP / 60-70% HR | 4.4h |
| Sun | Recovery @ 0-55% FTP / 0-59% HR | 55 min |
| WEEK 8 | ||
| Mon | Rest | - |
| Tue | Endurance + 3x15min sweet spot @ 88-93% FTP / 71-80% HR | 85 min |
| Wed | Easy endurance @ 56-75% FTP / 60-70% HR | 60 min |
| Thu | Endurance + 2x18min threshold @ 91-105% FTP / 81-90% HR | 85 min |
| Fri | Easy endurance @ 56-75% FTP / 60-70% HR | 55 min |
| Sat | Long endurance @ 56-75% FTP / 60-70% HR | 4.5h |
| Sun | Recovery @ 0-55% FTP / 0-59% HR | 55 min |
| WEEK 9 | ||
| Mon | Rest | - |
| Tue | Endurance + 3x16min sweet spot @ 88-93% FTP / 71-80% HR | 85 min |
| Wed | Easy endurance @ 56-75% FTP / 60-70% HR | 60 min |
| Thu | Endurance + 2x19min threshold @ 91-105% FTP / 81-90% HR | 85 min |
| Fri | Easy endurance @ 56-75% FTP / 60-70% HR | 55 min |
| Sat | Long endurance @ 56-75% FTP / 60-70% HR | 4.7h |
| Sun | Recovery @ 0-55% FTP / 0-59% HR | 55 min |
| WEEK 10 | ||
| Mon | Rest | - |
| Tue | Endurance + 3x16min sweet spot @ 88-93% FTP / 71-80% HR | 85 min |
| Wed | Easy endurance @ 56-75% FTP / 60-70% HR | 60 min |
| Thu | Endurance + 2x19min threshold @ 91-105% FTP / 81-90% HR | 85 min |
| Fri | Easy endurance @ 56-75% FTP / 60-70% HR | 55 min |
| Sat | Long endurance @ 56-75% FTP / 60-70% HR | 4.8h |
| Sun | Recovery @ 0-55% FTP / 0-59% HR | 55 min |
| WEEK 11 | ||
| Mon | Rest | - |
| Tue | Endurance + 3x17min sweet spot @ 88-93% FTP / 71-80% HR | 85 min |
| Wed | Easy endurance @ 56-75% FTP / 60-70% HR | 60 min |
| Thu | Endurance + 2x20min threshold @ 91-105% FTP / 81-90% HR | 85 min |
| Fri | Easy endurance @ 56-75% FTP / 60-70% HR | 55 min |
| Sat | Long endurance @ 56-75% FTP / 60-70% HR | 5.0h |
| Sun | Recovery @ 0-55% FTP / 0-59% HR | 55 min |
| WEEK 12 | ||
| Mon | Rest | - |
| Tue | Endurance + 3x17min sweet spot @ 88-93% FTP / 71-80% HR | 85 min |
| Wed | Easy endurance @ 56-75% FTP / 60-70% HR | 60 min |
| Thu | Endurance + 2x20min threshold @ 91-105% FTP / 81-90% HR | 85 min |
| Fri | Easy endurance @ 56-75% FTP / 60-70% HR | 55 min |
| Sat | Long endurance @ 56-75% FTP / 60-70% HR | 5.2h |
| Sun | Recovery @ 0-55% FTP / 0-59% HR | 55 min |
| WEEK 13 | ||
| Mon | Rest | - |
| Tue | Easy endurance @ 56-75% FTP / 60-70% HR | 60 min |
| Wed | Rest | - |
| Thu | Endurance + 2x8min tempo @ 76-90% FTP / 71-80% HR | 65 min |
| Fri | Rest | - |
| Sat | Long endurance @ 56-75% FTP / 60-70% HR | 3h |
| Sun | Recovery @ 0-55% FTP / 0-59% HR | 40 min |
| WEEK 14 | ||
| Mon | Rest | - |
| Tue | Endurance + 3x18min sweet spot @ 88-93% FTP / 71-80% HR | 85 min |
| Wed | Easy endurance @ 56-75% FTP / 60-70% HR | 60 min |
| Thu | Endurance + 2x21min threshold @ 91-105% FTP / 81-90% HR | 85 min |
| Fri | Easy endurance @ 56-75% FTP / 60-70% HR | 55 min |
| Sat | Long endurance @ 56-75% FTP / 60-70% HR | 5.5h |
| Sun | Recovery @ 0-55% FTP / 0-59% HR | 55 min |
| WEEK 15 | ||
| Mon | Rest | - |
| Tue | Endurance + 3x19min sweet spot @ 88-93% FTP / 71-80% HR | 85 min |
| Wed | Easy endurance @ 56-75% FTP / 60-70% HR | 60 min |
| Thu | Endurance + 2x22min threshold @ 91-105% FTP / 81-90% HR | 85 min |
| Fri | Easy endurance @ 56-75% FTP / 60-70% HR | 55 min |
| Sat | Long endurance @ 56-75% FTP / 60-70% HR | 5.6h |
| Sun | Recovery @ 0-55% FTP / 0-59% HR | 55 min |
| WEEK 16 | ||
| Mon | Rest | - |
| Tue | Endurance + 3x19min sweet spot @ 88-93% FTP / 71-80% HR | 85 min |
| Wed | Easy endurance @ 56-75% FTP / 60-70% HR | 60 min |
| Thu | Endurance + 2x22min threshold @ 91-105% FTP / 81-90% HR | 85 min |
| Fri | Easy endurance @ 56-75% FTP / 60-70% HR | 55 min |
| Sat | Long endurance @ 56-75% FTP / 60-70% HR | 5.8h |
| Sun | Recovery @ 0-55% FTP / 0-59% HR | 55 min |
| WEEK 17 | ||
| Mon | Rest | - |
| Tue | Endurance + 3x15min sweet spot @ 88-93% FTP / 71-80% HR | 90 min |
| Wed | Easy endurance @ 56-75% FTP / 60-70% HR | 60 min |
| Thu | Endurance + 2x20min threshold @ 91-105% FTP / 81-90% HR | 90 min |
| Fri | Easy endurance @ 56-75% FTP / 60-70% HR | 55 min |
| Sat | Long endurance + century pace sections @ 76-85% FTP / 71-80% HR | 6h |
| Sun | Recovery @ 0-55% FTP / 0-59% HR | 55 min |
| WEEK 18 | ||
| Mon | Rest | - |
| Tue | Endurance + 3x15min sweet spot @ 88-93% FTP / 71-80% HR | 90 min |
| Wed | Easy endurance @ 56-75% FTP / 60-70% HR | 60 min |
| Thu | Endurance + 2x20min threshold @ 91-105% FTP / 81-90% HR | 90 min |
| Fri | Easy endurance @ 56-75% FTP / 60-70% HR | 55 min |
| Sat | Long endurance + century pace sections @ 76-85% FTP / 71-80% HR | 6h |
| Sun | Recovery @ 0-55% FTP / 0-59% HR | 55 min |
| WEEK 19 | ||
| Mon | Rest | - |
| Tue | Endurance + 2x15min threshold @ 91-105% FTP / 81-90% HR | 80 min |
| Wed | Easy endurance @ 56-75% FTP / 60-70% HR | 50 min |
| Thu | Endurance + 2x12min sweet spot @ 88-93% FTP / 71-80% HR | 75 min |
| Fri | Rest | - |
| Sat | Long endurance + pace sections @ 76-85% FTP / 71-80% HR | 4h |
| Sun | Recovery @ 0-55% FTP / 0-59% HR | 45 min |
| WEEK 20 | ||
| Mon | Rest | - |
| Tue | Easy endurance @ 56-75% FTP / 60-70% HR | 55 min |
| Wed | Rest | - |
| Thu | Activation: 2x5min @ 91-105% FTP / 81-90% HR | 45 min |
| Fri | Rest | - |
| Sat | 200-Mile Ride Day | 10-14h |
| Sun | Rest | - |
Week-by-week breakdown
Week 1
Focus: Build endurance base.
Key session: Saturday long ride: the primary endurance builder for this week.
What to feel: Controlled effort. Finish each session feeling like you could do 15 more minutes.
Avoid: Going too hard on easy days.
Week 2
Focus: Build endurance base.
Key session: Saturday long ride: the primary endurance builder for this week.
What to feel: Controlled effort. Finish each session feeling like you could do 15 more minutes.
Avoid: Going too hard on easy days.
Week 3
Focus: Build endurance base.
Key session: Saturday long ride: the primary endurance builder for this week.
What to feel: Controlled effort. Finish each session feeling like you could do 15 more minutes.
Avoid: Going too hard on easy days.
Week 4
Focus: Build endurance base.
Key session: Saturday long ride: the primary endurance builder for this week.
What to feel: Controlled effort. Finish each session feeling like you could do 15 more minutes.
Avoid: Going too hard on easy days.
Week 5
Focus: Build endurance base.
Key session: Saturday long ride: the primary endurance builder for this week.
What to feel: Controlled effort. Finish each session feeling like you could do 15 more minutes.
Avoid: Going too hard on easy days.
Week 6
Focus: Progressive overload.
Key session: Saturday long ride: the primary endurance builder for this week.
What to feel: Challenging but manageable. The intervals should be hard but completeable.
Avoid: Not fueling properly for long rides.
Week 7
Focus: Progressive overload.
Key session: Saturday long ride: the primary endurance builder for this week.
What to feel: Challenging but manageable. The intervals should be hard but completeable.
Avoid: Not fueling properly for long rides.
Week 8
Focus: Progressive overload.
Key session: Saturday long ride: the primary endurance builder for this week.
What to feel: Challenging but manageable. The intervals should be hard but completeable.
Avoid: Not fueling properly for long rides.
Week 9
Focus: Progressive overload.
Key session: Saturday long ride: the primary endurance builder for this week.
What to feel: Challenging but manageable. The intervals should be hard but completeable.
Avoid: Not fueling properly for long rides.
Week 10
Focus: Progressive overload.
Key session: Saturday long ride: the primary endurance builder for this week.
What to feel: Challenging but manageable. The intervals should be hard but completeable.
Avoid: Not fueling properly for long rides.
Week 11
Focus: Progressive overload.
Key session: Saturday long ride: the primary endurance builder for this week.
What to feel: Challenging but manageable. The intervals should be hard but completeable.
Avoid: Not fueling properly for long rides.
Week 12
Focus: Progressive overload.
Key session: Saturday long ride: the primary endurance builder for this week.
What to feel: Challenging but manageable. The intervals should be hard but completeable.
Avoid: Not fueling properly for long rides.
Week 13
Focus: Recovery and absorption.
Key session: Saturday long ride: the primary endurance builder for this week.
What to feel: Fresh and restless. Trust the process.
Avoid: Skipping the recovery week.
Week 14
Focus: Progressive overload.
Key session: Saturday long ride: the primary endurance builder for this week.
What to feel: Challenging but manageable. The intervals should be hard but completeable.
Avoid: Not fueling properly for long rides.
Week 15
Focus: Progressive overload.
Key session: Saturday long ride: the primary endurance builder for this week.
What to feel: Challenging but manageable. The intervals should be hard but completeable.
Avoid: Not fueling properly for long rides.
Week 16
Focus: Progressive overload.
Key session: Saturday long ride: the primary endurance builder for this week.
What to feel: Challenging but manageable. The intervals should be hard but completeable.
Avoid: Not fueling properly for long rides.
Week 17
Focus: Race preparation.
Key session: Saturday long ride: the primary endurance builder for this week.
What to feel: Sharp and efficient. Rides feel easier at the same power.
Avoid: Not fueling properly for long rides.
Week 18
Focus: Race preparation.
Key session: Saturday long ride: the primary endurance builder for this week.
What to feel: Sharp and efficient. Rides feel easier at the same power.
Avoid: Not fueling properly for long rides.
Week 19
Focus: Race preparation.
Key session: Saturday long ride: the primary endurance builder for this week.
What to feel: Sharp and efficient. Rides feel easier at the same power.
Avoid: Not fueling properly for long rides.
Week 20
Focus: Race preparation.
Key session: Saturday long ride: the primary endurance builder for this week.
What to feel: Sharp and efficient. Rides feel easier at the same power.
Avoid: Not fueling properly for long rides.
Fueling your training
200-mile nutrition is a discipline in itself. At this distance, caloric deficit is inevitable and the goal is to minimize it.
🍌 Before rides
Eat a carb-rich meal 3 hours before. Aim for 150-200g carbohydrates for ultra-distance rides.
⚡ During rides
60-90g carbs per hour from the first 20 minutes. Mix gels, bars, and real food. Practice your exact race nutrition on every long ride over 4 hours.
🥛 After rides
Recovery nutrition within 30 minutes. 1.2g carbs per kg bodyweight plus 20-30g protein.
💧 Hydration
500-750ml per hour with electrolytes. For rides over 5 hours, include sodium tabs to prevent hyponatremia.
🏁 Race day
Pre-ride meal 3-4 hours before start. Carry enough for 10-14 hours of riding. Know every aid station location.
Gear checklist
Essential
Nice to have
5 mistakes that derail 200 mile training plans
Not doing enough back-to-back long days
A single long ride does not simulate ultra fatigue. Back-to-back weekend rides teach your body to perform on tired legs.
✅ Fix: Include at least 4 back-to-back weekends in the build phase.
Underestimating nutrition needs
At 200 miles, you need 60-90g carbs per hour for 10-14 hours. That is 600-1200g of carbs total. Most riders eat half of what they need.
✅ Fix: Calculate your total caloric need and plan your food supply before the ride.
Going too hard in the first 50 miles
200 miles requires extreme pacing discipline. If you ride the first quarter above 80% FTP, you will bonk before mile 120.
✅ Fix: Cap power at 70-75% FTP for the first 50 miles.
Not training in similar conditions
If your event is hilly, hot, or at altitude, train for those conditions. A flat training plan will not prepare you for 15,000 feet of climbing.
✅ Fix: Simulate event conditions in your long rides.
Ignoring mental preparation
200 miles takes 10-14 hours. Physical fitness alone is not enough. Mental resilience determines whether you finish.
✅ Fix: Practice mental strategies during long rides: chunking the distance, positive self-talk, and distraction techniques.
Ride day tips
Break the ride into segments
Do not think about 200 miles. Think about the next aid station, the next town, the next climb. Mental fatigue is the biggest enemy on an ultra ride.
Start slower than you think
Your first 50 miles should feel embarrassingly easy. 70-75% FTP maximum. Save everything for the second half.
Have a crew or support plan
200 miles of self-supported riding is possible but much harder. A support vehicle or crew at key points makes a significant difference.
Train your non-cycling systems
Neck, shoulders, hands, and saddle contact points all need conditioning for 10-14 hours. Practice your exact position and kit on every long ride.
Why a personalized plan outperforms this one
This plan provides a solid framework for century preparation. But a plan built from your actual power data, recovery metrics, and weekly schedule adapts to you instead of asking you to adapt to it.
| Aspect | This plan | Personalized plan |
|---|---|---|
| Power targets | All intervals based on generic % FTP ranges. Without a recent FTP test, targets may not match your actual fitness. | ✓ Intervals calibrated to your tested FTP, updated after every test and performance breakthrough. |
| Weekly volume | Fixed at 8 hours per week for every rider. | ✓ Adjusted to your real available hours, which can change week to week based on life and work. |
| Recovery timing | Recovery week fixed at week 8 regardless of fatigue. | ✓ Reads your HRV, sleep quality, and training load to prescribe recovery when your body needs it. |
| Missed sessions | Plan does not adjust. You fall behind or skip ahead. | ✓ Plan recalibrates the following week based on what you actually completed. |
| Race-specific preparation | Generic century pacing for a flat course. | ✓ Adjusts interval profiles and long ride structure based on your specific race course profile. |
Start Free · Pay Nothing Today · Cancel Anytime
200-Mile Ultra Ride training plan FAQ
Common questions about training for a 200-mile ultra ride.
No. 4 weeks is not enough to safely build the muscular endurance and fueling tolerance a 200-mile event demands. Even with a strong base, you would arrive at the start line undertrained and at high risk of DNF or injury. The minimum responsible build is 12-16 weeks for experienced riders; 20-24 weeks for everyone else.
Not safely. The combination of cumulative fatigue, fueling demands and saddle time over 10+ hours requires specific preparation. Attempting it untrained risks rhabdomyolysis, severe dehydration, GI failure and orthopedic injuries. Build to a 100-mile ride first if you have not done one.
No special bike is required, but comfort matters far more than aero gains for ultra-distance. Prioritize a precise bike fit, a saddle that proven comfortable on 4+ hour rides, padded shorts in good condition and tires that handle the surfaces you will ride. A second pair of shorts and chamois cream are essential.
Plan 7-14 days of structured easy recovery. Day 1-2: complete rest plus carb-protein refeed. Day 3-5: walking and easy 30-min spins only. Week 2: gradually return to 60-90 min easy rides. Avoid intensity for at least 14 days. Sleep 9+ hours per night. Expect appetite, immune system and mood to be off for several days.
Most weekday sessions yes. But the back-to-back weekend rides and the longest rides (5-7 hours) should be done outdoors when possible — the mental and saddle-comfort demands of indoor riding past 3 hours are usually worse than outdoor. Use Zwift for structured intervals and short recovery rides.
Most intermediate riders complete 200 miles in 10 to 14 hours of riding time, depending on terrain and conditions. Including rest stops, plan for 12 to 16 hours total.
No. Your longest training ride should be 5-6 hours, not the full distance. The taper and accumulated training cover the gap.
Plan for 60-90g of carbohydrates per hour for 10-14 hours. That is 600-1200g of carbs total, or roughly 2400-4800 calories from carbs alone.
This plan targets a single-day 200-mile effort. For multi-day stage races, the recovery and nutrition strategy would be different.
Complete a 100-mile ride first. This plan assumes you have that base. Start with the intermediate 100-mile plan.
Drafting saves 20-30% energy. On a 200-mile ride, that is the difference between finishing strong and bonking. Ride with others when possible.